Get ready for a GAME changer! This is literally changing my life! Haha ok maybe not so dramatic, but this hide-away pantry is an amazing storage alternative that will open up some cabinet space!!! This kitchen storage is made by creating a slim sliding shelving unit for the space between your wall and refrigerator. It’s amazing what a little wood and paint will do!
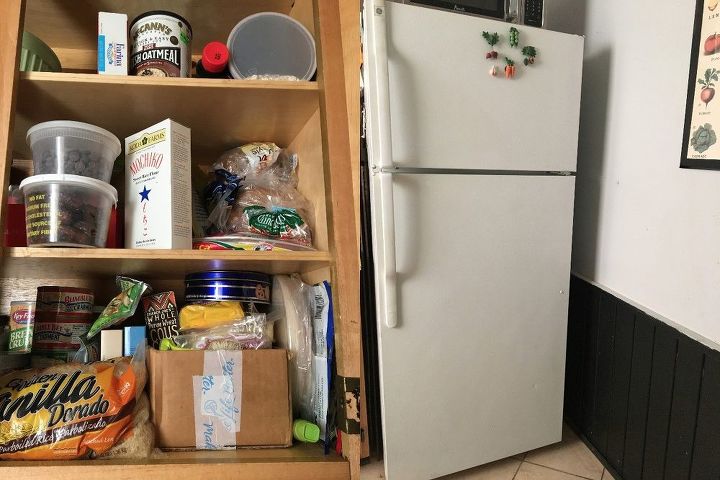
Ok so if you have a cupboard that looks anything like this you need to utilize that space you see to the right beside the fridge…. -Life changed-
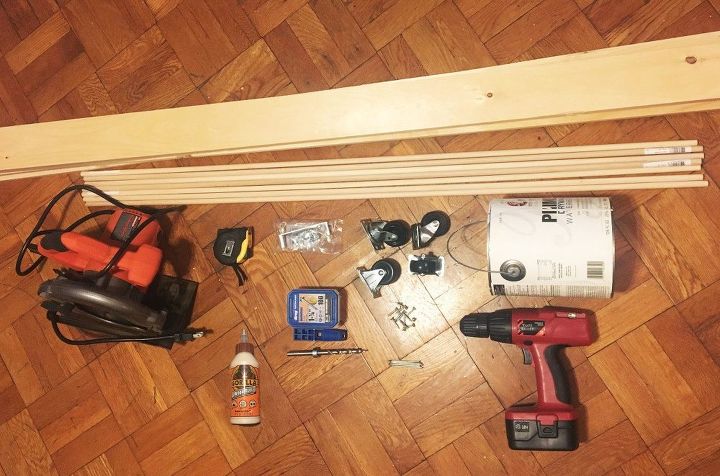
SUPPLIES:
-4-5 1″x4″x8′ Common Board Panels
-7 7/16″ wooden dowels
-Kreg Jig / Kreg Screws
-Drill
-Saw
-Paint (optional)
-4 2″ castor wheels
-Wood Glue
-Nails
-Handle / Drawer Pull
-Thin Board Cut to size (not pictured above… I used my left over faux brick panel, but you can use bead board or something of that sort)STEP 1: Measure the height and depth of your refrigerator as well as the space you have available between the wall and the side of the refrigerator.
STEP 2: Use the measurements from step 1 to cut out several wood pieces. You will need a front and back panel, a top and bottom and as many shelves as you desire. Remember that you will be applying wheels to the bottom of the unit so you should subtract the height of the wheels from the length for the front and back panels. Below are the measurements I had and what I cut in accordance. You can use it as a reference:
My refrigerator measured from floor to top at 67″ and in depth from front to wall at 31″. Keeping in mind that my wood panels were 1″ thick and I had 2.25″ wheels I cut pieces as follows:
Front & Back – 2 pieces 65″
Top & Bottom – 2 pieces 29″
Shelves – 6 pieces 29″
I also cut each of the 7 wooden dowels to 29″ as well.
STEP 3: Set up your cut pieces in a ladder-like style making sure each of them fit together correctly.
STEP 4: Use a Kreg jig to create holes on the bottom of each shelf as well as on the bottom of the top and bottom wood pieces. Place these holes on each end of the pieces. Then screw each shelf and top and bottom panel in their place. I decided to make a variety of shelf sizes to accommodate various dry goods rather than keeping even spacing. Just be sure that you screw each shelf in straight by inserting them at the same height on both the front and back panel.
STEP 5: Once all your shelves are in place it is time to cut out and prepare the back panel for the shelf. (I used a piece of leftover paneling from my faux brick wall project hehe) Just cut a rectangle that is the same size in height and depth as the ladder structure you just created. For instance mine was 65″x31″.
When your panel piece is cut and ready to go simply nail it into place on the back of the unit. Nail the panel in place around the perimeter.
STEP 6: Now it’s time to add the dowels! Simply grab some wood glue and glue each dowel above each shelf an even distance on each side so it lays straight For the smaller shelves I placed the dowels 2-2.5″ above the shelf and for the larger shelves 4-5″. Be sure to allow the wood glue to completely dry before moving forward.
STEP 7: Now simply paint or stain your shelving unit in the colors of your choice to match your kitchen! I intend to change my cabinet colors at some point so I just painted it all white to match the refrigerator.
STEP 8: Once your paint has dried you can add the castors and the handle. Screw in 4 wheels to the bottom of the shelf so that it can roll in and out of it’s space with ease.
Add the handle to the center of the front panel.
STEP 9: Now simply place your pantry next to your fridge (or in the designated area you made it for) and stock it full of your favorite treats and eats!
Look how discreet that thing is! Geesh I love it.
You have no clue how much cabinet space this has freed up! I don’t have space in my kitchen to add any stand alone unit so this sneaky little piece is perfection!
I have been fumbling through my spices for years! Now I can see them all in front of me! Oh man I can’t wait to cook. I showed a close up so you can see the brick panel. You can create a design if you want a pop of fun when you open the hideaway too if you want…